How to Deploy WordPress with Amazon RDS
Hosting personal websites and blogs often seems to be a bit hectic. I am sure many of you might be interested in hosting their blogs/websites without spending hefty capital every month on different hosting platforms.
What if I tell you that there's a way to do it, and you'll be having complete control over your website. That's where Amazon AWS comes in.
AWS has lots of services for different use cases. But when it comes to hosting, Amazon RDS seems to be a pretty good service.
As the title suggests, we will be configuring Amazon RDS(Relational Database services) and connecting it with our WordPress application.
1. Why use MySQL for WordPress?
WordPress is a flexible content management system for building blogs, e-commerce sites, personal websites, and more. WordPress is the easiest and most powerful blogging and website builder. No matter what type of website you choose to assemble, there will be the need to store the content.
In a blog, it will be your blog posts, comments, and images. If you raise an e-commerce site, it will be your product catalog and user accounts. All this content needs to be permanently stored somewhere. WordPress uses MySQL to hoard this content.
A relational database is a good choice for storing hierarchical data like this. Further, MySQL is the most popular open-source database, and it is a reliable, performant choice for this application.
2. Why use Amazon RDS?
Amazon RDS is a managed service that means tenants only need to focus on using the resources while AWS will supervise all the underlying concerns you have.
If we put the MySQL database on the same server as our WordPress installation, the crucial issue will be competing for computing resources on the same server, potentially hurting our website performance.
- By using Amazon RDS for MySQL, these concerns go away. Our database will be on a separate instance from your WordPress installation. So there won't be any competition for resources. Further, we can also create multiple WordPress installations that connect to a single MySQL instance on RDS, allowing us to scale your site horizontally.
- Amazon RDS for MySQL has automated backups and security patches to help you with your database administration.
3. Why use AWS EC2 for WordPress?
Using our own desktop or server is fine. But if we want your website to be available 24x7 over the public internet, then using EC2 Instance as our WordPress server is the better choice.
- Amazon EC2 provides on-demand server provisioning. With EC2(Elastic Compute Cloud), we can rent out server instances of varying sizes, each with a different CPU, RAM, and network configuration.
- We can pay by the hour/minutes for these servers, and we can use them to host whatever type of websites, like your WordPress site.
- With an EC2 instance, our WordPress site will remain up and running and will be accessible by anyone over the internet.
4. Creating an AWS EC2 Instance for Deploying WordPress
- After logging into your aws console, search for EC2 service and click on create an instance.
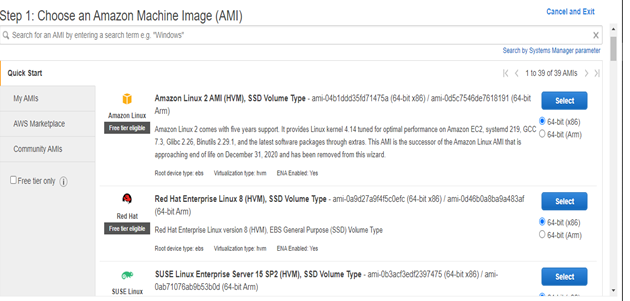
- Choose an Amazon Machine Image (AMI), select any Linux image as per your choice.
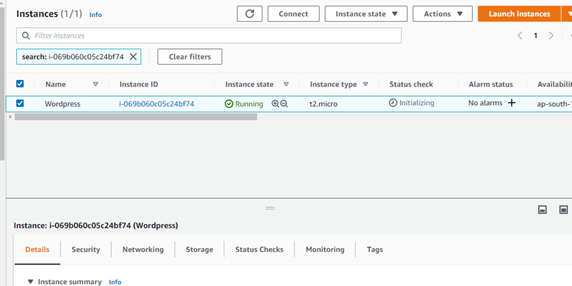
- Choose the type of instance, configure the instance network, Add storage to your instance, configure the firewall to make it secure, and launch the instance.
Installing the Apache Web server, PHP, and other dependencies.
- SSH your virtual machine and type the following command in the
Terminal.
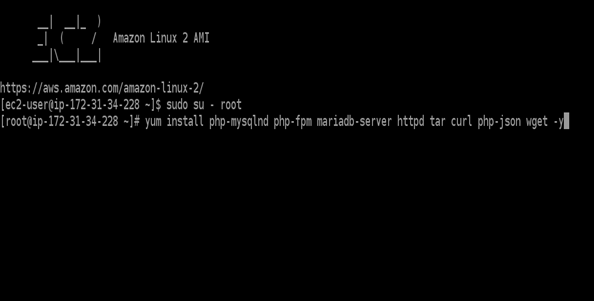
$ sudo yum install php-mysqlnd php-fpm mariadb-server httpd tar curl php-json wget -y
$ sudo amazon-linux-extras install php7.3
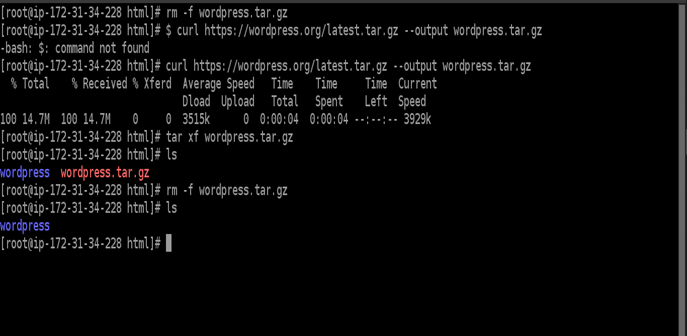
- Download the WordPress from- https://wordpress.org/latest.zip, and extract it inside /var/www/html so that we can access the website.
- If you are using RedHat or Amazon Linux image, then use the following commands!
$ sudo curl https://wordpress.org/latest.tar.gz --output wordpress.tar.gz
$ sudo tar xf wordpress.tar.gz
$ mv wordpress /var/www/html
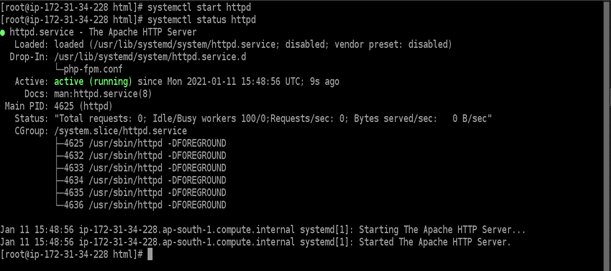
- Now start the apache server using the following command
$ sudo systemctl start httpd
$ sudo systemctl enable httpd
$ sudo systemctl status httpd
Configure MySQL Database server using RDS
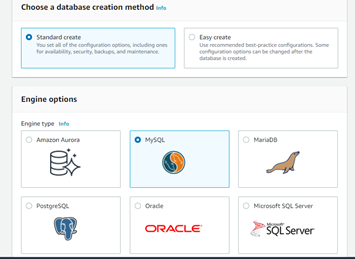
- Search for RDS service and click on create a database.
- Choose a database creation method as standard create.
- Select engine option as MySQL
- Select the MySQL version, and under the template select Free tier (if you are using an AWS free tier account).
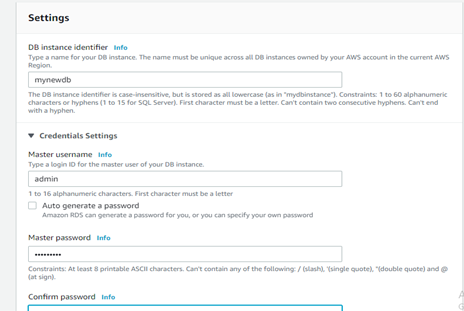
- Name your database, and under credentials, settings put Master username and password. It will be the username to access your database.
- Under the connectivity option select the default VPC option, or we can create a new vpc. In Public access select “No” as we don’t want our database to have outside/Internet connectivity for security reasons.

- Select Availability zone, and Security group would be the default, or we can Add rules according to our use case. Database port will be default 3306, as MySQL uses port 3306.
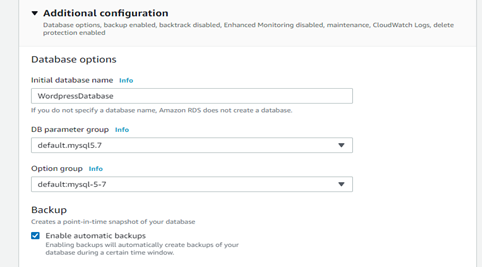
- In the Additional configuration add the initial database name where your WordPress data will be stored.
Endpoint
Finally, to connect our newly created database with the WordPress application we have to paste the endpoint URL inside our WordPress configuration file.
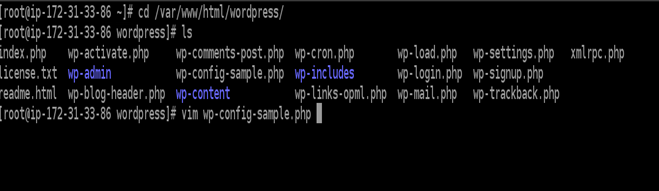
- Firstly, SSH the Instance we created and paste the following commands on the terminal.
$ cd /var/www/html/wordpress/ now open the file name wp-config-sample.php using the following command.
$ vim wp-config-sample.php
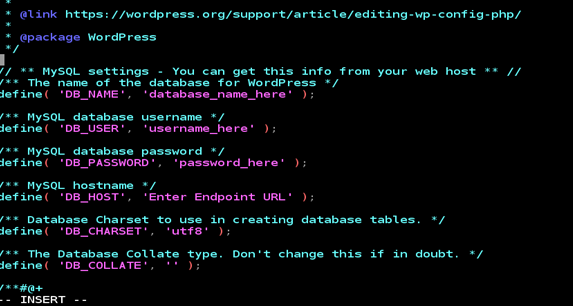
- Scroll through the file and enter the DB_NAME, DB_USER, DB_PASSWORD,& DB_HOST.
- In the DB_HOST enter your endpoint URL. Our endpoint URL would be the URL we got after creating the RDS MySQL database.
- Finally, save the file as wp-config.php
- Now open up your browser and paste your EC2 Instance Public IP address.
- Explore the settings and enter the details to start creating your new blogs.
Conclusion
Amazon RDS provides high availability and failover support for DB instances using Multi-AZ deployments, so our database would be 24x7 online. To discover the potential of AWS cloud computing and its services, check out our AWS Certified Solutions Architect (Associate) course and get exam-ready.