How to Build Your First REST API with Spring MVC - A Complete Step-by-Step Guide
Most Spring MVC tutorials show you fragments - a controller here, an annotation there. By the end, you have a collection of disconnected pieces but no real understanding of how a complete REST API comes together. This tutorial is different. You'll build a working Product API from scratch, step by step, understanding every decision along the way.
By the end of this guide, you'll have a fully functional Spring MVC REST API with proper routing, request data handling, JSON responses, input validation, and global error handling - the same structure used in production Spring Boot applications. Every section builds on the previous one, so the final result is a complete, coherent codebase rather than a set of isolated examples.
Before diving in, if you're new to Spring's core concepts - IoC, beans, and dependency injection - Board Infinity's guide on core Java concepts and syntax and OOP concepts in Java will give you the right foundation. This tutorial assumes basic Java and Spring knowledge and focuses entirely on building the API.
What You'll Build
A Product REST API with full CRUD operations: GET /api/products, GET /api/products/{id}, POST /api/products, PUT /api/products/{id}, DELETE /api/products/{id}. Every endpoint will have proper HTTP status codes, input validation, and structured error responses.
Prerequisites
You'll need Java 17 or later, Maven or an IDE with Maven support (IntelliJ IDEA recommended), basic understanding of Java classes and OOP, and basic knowledge of what HTTP methods (GET, POST, PUT, DELETE) do. Board Infinity's classes and objects in Java guide covers the Java class model that every Spring @RestController, @Service, and model class is built on - if any of the class and constructor patterns in this tutorial feel unfamiliar, that guide is the right starting point.
Step 1 - Setting Up a Spring Project with Maven
The fastest way to set up a Spring Boot project is via start.spring.io. Select Maven, Java, Spring Boot 3.x, and the dependencies: Spring Web, Spring Boot DevTools, Validation. This generates a project with everything needed. The most important file is pom.xml - it declares your dependencies and build configuration.
spring-boot-starter-web bundles Spring MVC, Jackson (for JSON serialisation), and an embedded Tomcat server. You don't need to configure a separate web server - when you run your Spring Boot app, Tomcat starts automatically on port 8080. Understanding the Java servlet architecture that embedded Tomcat runs on is covered in Board Infinity's understanding servlets in Java guide - Spring MVC's DispatcherServlet is a Java servlet, and understanding the servlet model explains why Spring Boot's embedded Tomcat approach is so powerful.
<dependencies><!-- Spring Web - includes Spring MVC + embedded Tomcat -->
<dependency>
    <groupId>org.springframework.boot</groupId>
    <artifactId>spring-boot-starter-web</artifactId>
</dependency><!-- Bean Validation - enables @Valid, @NotBlank, @Email etc. -->
<dependency>
    <groupId>org.springframework.boot</groupId>
    <artifactId>spring-boot-starter-validation</artifactId>
</dependency><!-- DevTools - auto-restarts app on file save -->
<dependency>
    <groupId>org.springframework.boot</groupId>
    <artifactId>spring-boot-devtools</artifactId>
    <scope>runtime</scope>
    <optional>true</optional>
</dependency>
The spring-boot-starter-web dependency bundles Spring MVC, Jackson (for JSON serialisation), and an embedded Tomcat server. You don't need to configure a separate web server - when you run your Spring Boot app, Tomcat starts automatically on port 8080. This is one of Spring Boot's biggest advantages over raw Spring MVC.
Step 2 - Creating Your Model and Service Layer
Before writing the controller, define the data model and a simple in-memory service. In a real application this would connect to a database - but for this tutorial an in-memory Map keeps the focus on the API layer.
The Product class uses private fields with getters and setters - the encapsulation principle applied directly. Board Infinity's abstraction vs encapsulation in Java guide explains why this matters in Spring: Jackson's JSON deserialiser uses these getter and setter methods to map JSON fields to Java object properties. Without getters, Jackson can't serialise the Product to JSON. Without setters (or a matching constructor), Jackson can't deserialise an incoming JSON body to a Product object. The Map<Long, Product> in-memory store and Optional<Product> return types in ProductService use Java generics throughout. Board Infinity's generics in Java guide explains the <Long, Product> and <Product> type parameters - they tell the compiler exactly what types the collection holds, preventing type errors at compile time rather than runtime.
public class Product {private Long   id;
private String name;
private String description;
private double price;
private int    stock;// Default constructor (required by Jackson for JSON deserialisation)
public Product() {}public Product(Long id, String name, String description,
               double price, int stock) {
    this.id          = id;
    this.name        = name;
    this.description = description;
    this.price       = price;
    this.stock       = stock;
}// Getters and setters for all fields
public Long   getId()          { return id; }
public String getName()        { return name; }
public String getDescription() { return description; }
public double getPrice()       { return price; }
public int    getStock()       { return stock; }
public void   setId(Long id)    { this.id = id; }
public void   setName(String n) { this.name = n; }
public void   setPrice(double p){ this.price = p; }
public void   setStock(int s)   { this.stock = s; }
}
@Service
public class ProductService {// In-memory store - replace with JPA repository in a real app
private final Map<Long, Product> store     = new ConcurrentHashMap<>();
private final AtomicLong          idCounter = new AtomicLong(1);public List<Product> findAll() {
    return new ArrayList<>(store.values());
}public Optional<Product> findById(Long id) {
    return Optional.ofNullable(store.get(id));
}public Product create(Product product) {
    Long id = idCounter.getAndIncrement();
    product.setId(id);
    store.put(id, product);
    return product;
}public Optional<Product> update(Long id, Product updated) {
    if (!store.containsKey(id)) return Optional.empty();
    updated.setId(id);
    store.put(id, updated);
    return Optional.of(updated);
}public boolean delete(Long id) {
    return store.remove(id) != null;
}
}
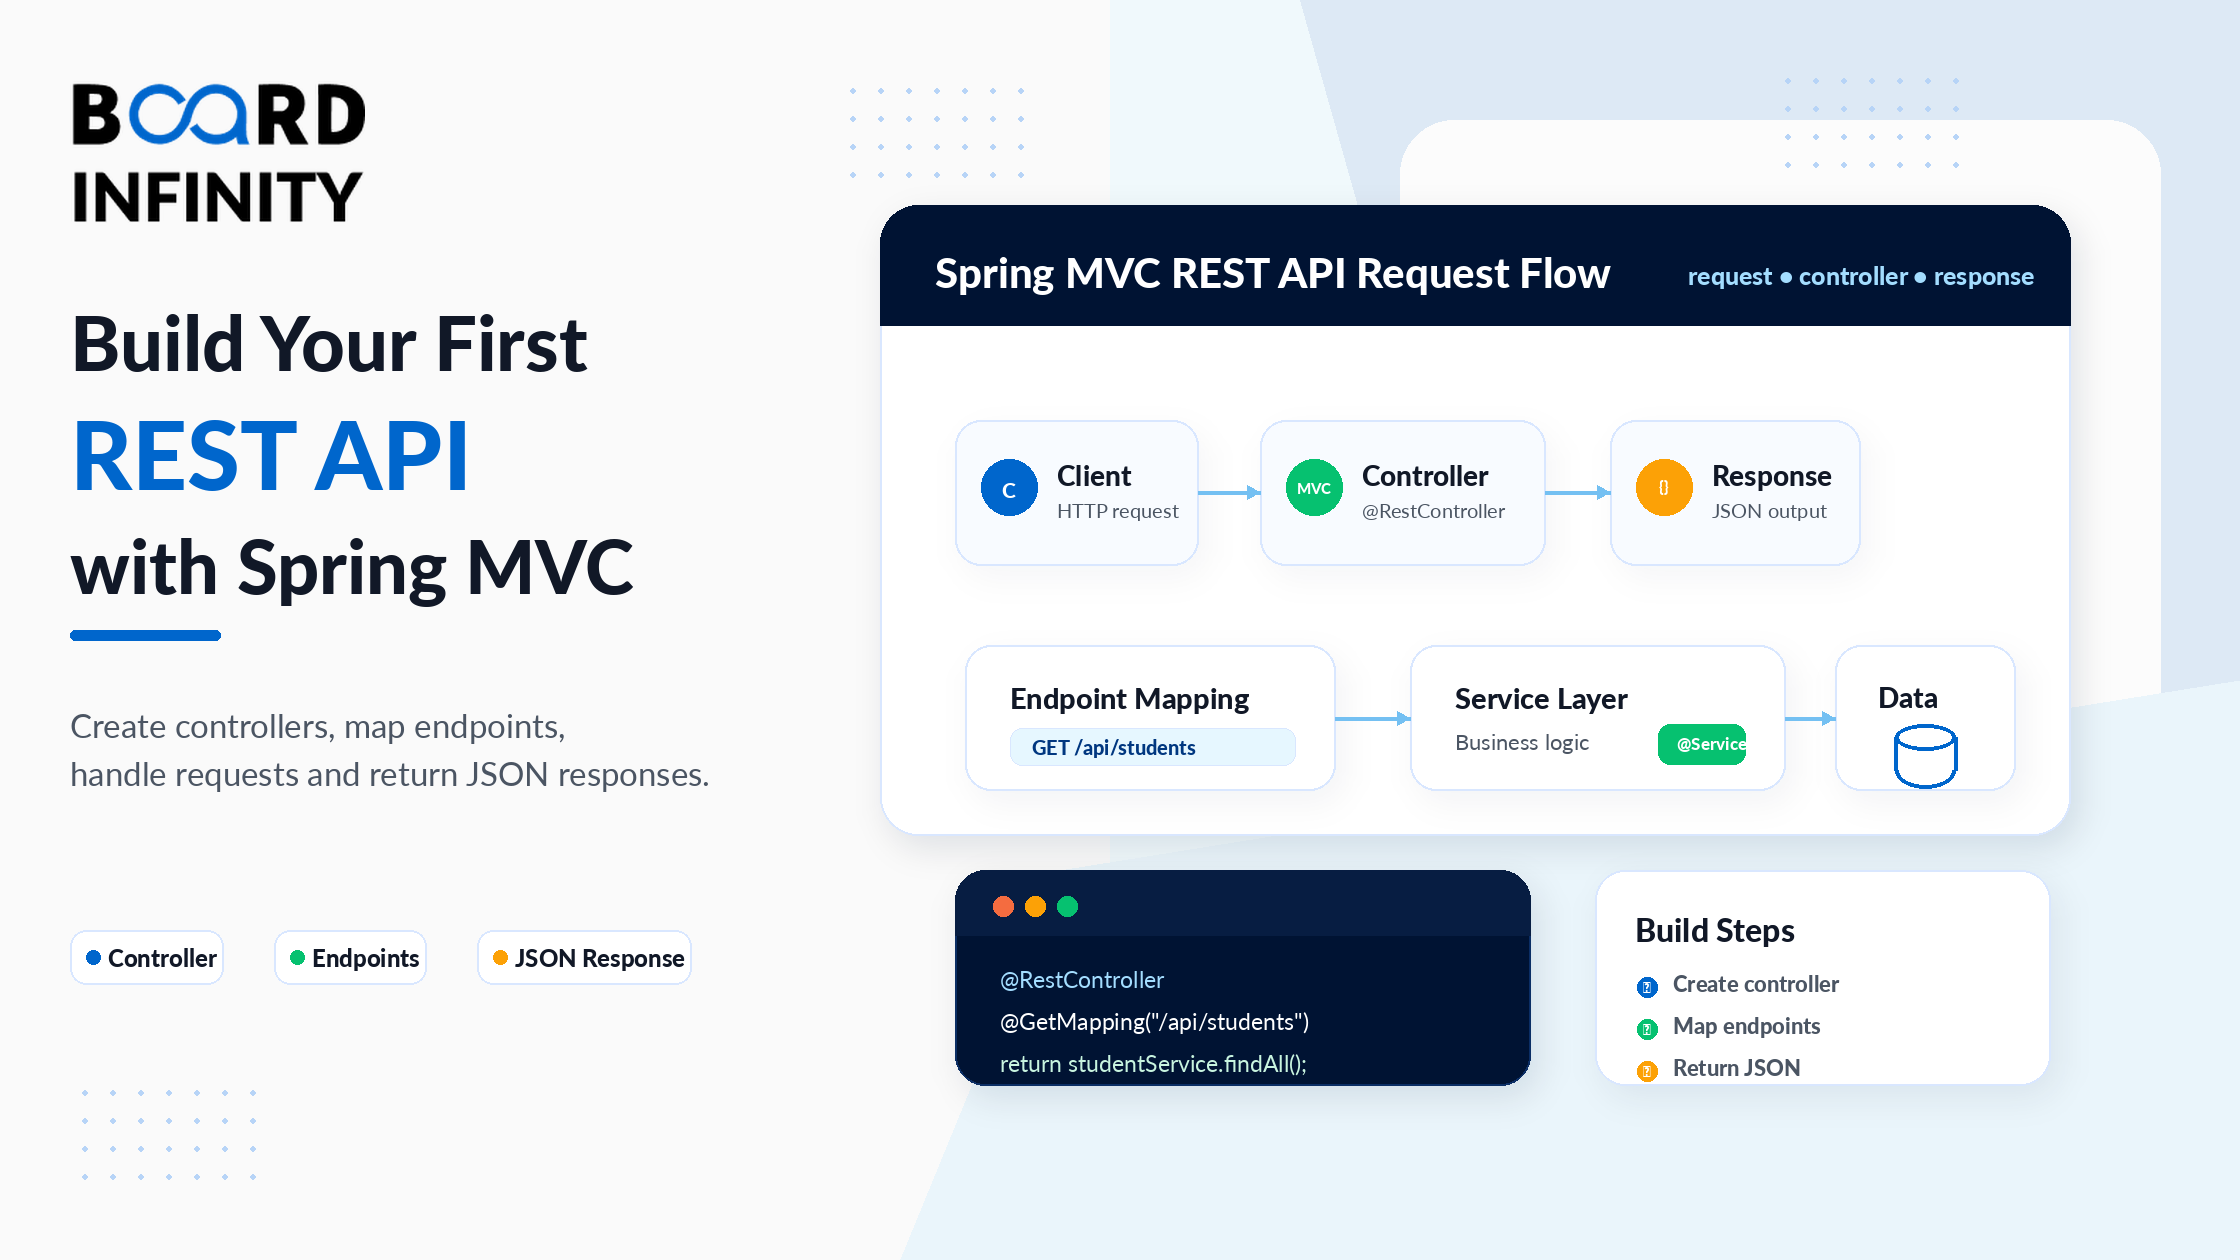
Step 3 - Creating Your First @RestController
The controller is where HTTP requests meet your business logic. @RestController tells Spring this class handles REST API requests and that every method's return value should be written directly to the HTTP response as JSON.
Constructor injection - public ProductController(ProductService productService) - is the recommended approach for wiring dependencies. This is Java's regular constructor, called by Spring's IoC container at startup. The understanding polymorphism in Java guide covers the principle behind why ProductController receives a ProductService reference rather than a concrete implementation - constructor injection through the interface type is polymorphism applied to dependency injection, making the controller testable and swappable without changing the controller code itself.
@RestController               // = @Controller + @ResponseBody on every method
@RequestMapping("/api/products") // base URL for all endpoints in this controller
public class ProductController {
private final ProductService productService;

// Constructor injection - the recommended approach
public ProductController(ProductService productService) {
    this.productService = productService;
}

// GET /api/products
@GetMapping
public List<Product> getAllProducts() {
    return productService.findAll();
}
// More endpoints coming in steps 4 and 5...
}
Putting @RequestMapping("/api/products") on the class means every method inside automatically inherits that base path. @GetMapping with no value maps to /api/products. @GetMapping("/{id}") maps to /api/products/{id}. This keeps your URLs consistent and avoids repeating the base path in every method.
Step 4 - Mapping Routes with @GetMapping, @PostMapping, @PutMapping, @DeleteMapping
Spring provides dedicated annotations for each HTTP method. Each maps a URL pattern to a controller method. The Optional<Product> returned by findById() and update() - and the .map(ResponseEntity::ok).orElse(ResponseEntity.notFound().build()) pattern - is the Optional chaining approach that eliminates null checks throughout the controller layer. Board Infinity's learn about Java list guide and Java list collections overview provide useful context on the Java collections that the findAll() method returns - the List<Product> from the service layer is what Spring's Jackson serialiser converts directly into a JSON array response. The what is composition in Java guide also applies here: ProductController owns a ProductService as a composed dependency, and this composition - rather than inheritance - is the pattern that keeps Spring's three-layer architecture clean and testable.
| Annotation | HTTP Method | URL Pattern | Use For | Success Status |
|---|---|---|---|---|
@GetMapping |
GET | /api/products |
Retrieve all resources | 200 OK |
@GetMapping("/{id}") |
GET | /api/products/1 |
Retrieve one resource by ID | 200 OK |
@PostMapping |
POST | /api/products |
Create a new resource | 201 Created |
@PutMapping("/{id}") |
PUT | /api/products/1 |
Replace an existing resource | 200 OK |
@DeleteMapping("/{id}") |
DELETE | /api/products/1 |
Remove a resource | 204 No Content |
@RestController
@RequestMapping("/api/products")
public class ProductController {
private final ProductService productService;

public ProductController(ProductService productService) {
    this.productService = productService;
}

// GET /api/products - list all
@GetMapping
public List<Product> getAll() {
    return productService.findAll();
}

// GET /api/products/1 - get by ID
@GetMapping("/{id}")
public ResponseEntity<Product> getById(@PathVariable Long id) {
    return productService.findById(id)
        .map(ResponseEntity::ok)
        .orElse(ResponseEntity.notFound().build());
}

// POST /api/products - create new
@PostMapping
public ResponseEntity<Product> create(@RequestBody Product product) {
    Product created = productService.create(product);
    return ResponseEntity.status(201).body(created);
}

// PUT /api/products/1 - full update
@PutMapping("/{id}")
public ResponseEntity<Product> update(
        @PathVariable Long id,
        @RequestBody Product product) {
    return productService.update(id, product)
        .map(ResponseEntity::ok)
        .orElse(ResponseEntity.notFound().build());
}

// DELETE /api/products/1 - remove
@DeleteMapping("/{id}")
public ResponseEntity<Void> delete(@PathVariable Long id) {
    return productService.delete(id)
        ? ResponseEntity.noContent().build()   // 204 - deleted
        : ResponseEntity.notFound().build();   // 404 - not found
}
}
Step 5 - Reading Request Data: @PathVariable, @RequestParam, @RequestBody
Every REST API needs to read data from incoming requests. Spring provides three annotations for the three places data can come from: the URL path, the query string, and the request body.
The stream operations in the search() method - .stream().filter(...).filter(...).collect(Collectors.toList()) - apply Java Streams directly in the controller. Board Infinity's map stream in Java guide covers these chained stream operations: each .filter() is a predicate applied to the product stream, and .collect(Collectors.toList()) gathers the results. The @PathVariable Long id parameter uses the Long wrapper type - Board Infinity's understanding wrapper class in Java guide explains why Long (not long) is used: Spring's web layer converts the String URL segment to Long via autoboxing, and the nullable wrapper type handles cases where the path variable is missing more gracefully than a primitive long would.
| Annotation | Where Data Comes From | Example URL or Request | Use For |
|---|---|---|---|
@PathVariable |
URL path segment | /api/products/42 |
Resource identifiers |
@RequestParam |
URL query string | /api/products?category=tech&sort=price |
Filters, sorting, pagination |
@RequestBody |
HTTP request body (JSON) | POST body: {"name":"Laptop","price":999} |
Creating or updating resources |
@RestController
@RequestMapping("/api/products")
public class ProductController {
// @PathVariable - from URL: GET /api/products/42
@GetMapping("/{id}")
public ResponseEntity<Product> getById(@PathVariable Long id) {
    return productService.findById(id)
        .map(ResponseEntity::ok)
        .orElse(ResponseEntity.notFound().build());
}

// @RequestParam - from query string: GET /api/products?category=tech&minPrice=100
@GetMapping("/search")
public List<Product> search(
        @RequestParam String  category,
        @RequestParam(defaultValue = "0") double minPrice,
        @RequestParam(defaultValue = "name") String sort) {
    return productService.findAll().stream()
        .filter(p -> p.getDescription().contains(category))
        .filter(p -> p.getPrice() >= minPrice)
        .collect(Collectors.toList());
}

// @RequestBody - from JSON body: POST /api/products
// Body: {"name": "Laptop", "price": 999.0, "stock": 50}
@PostMapping
public ResponseEntity<Product> create(@RequestBody Product product) {
    // Jackson automatically deserialises the JSON body into a Product object
    Product saved = productService.create(product);
    return ResponseEntity.status(201).body(saved);
}
}
A common beginner confusion: when to use @PathVariable vs @RequestParam. The rule is simple - if the value identifies a specific resource, put it in the path (/products/42). If the value filters, sorts, or paginates a collection, put it in the query string (/products?category=tech&page=1). This follows REST conventions and makes your API URLs intuitive for consumers.
Step 6 - Input Validation with @Valid and Constraint Annotations
Never trust data coming into your API. A client could send an empty product name, a negative price, or no data at all. Without validation, that invalid data reaches your service layer - or worse, your database. Spring's Bean Validation integration stops invalid data at the controller layer before it goes anywhere.
The validation annotations on the Product class - @NotBlank, @Size, @Positive, @Min - are applied to private fields. The encapsulation that makes these fields private is also what makes the validation meaningful: external code can't bypass the constraint by directly setting product.price = -1 - it must go through setPrice(), and the validator checks the value before the object is accepted. Board Infinity's access modifiers in Java guide covers why private fields matter here - access control at the Java level and validation at the framework level work together to protect data integrity from two different angles. The throw and throws in Java guide is also relevant: when @Valid fails, Spring throws MethodArgumentNotValidException - an unchecked exception that propagates up to the @RestControllerAdvice handler in Step 7.
public class Product {
private Long id; // no constraint - assigned by server

@NotBlank(message = "Product name is required")
@Size(min = 2, max = 100, message = "Name must be 2-100 characters")
private String name;

@NotBlank(message = "Description is required")
private String description;

@Positive(message = "Price must be a positive number")
private double price;

@Min(value = 0, message = "Stock cannot be negative")
private int stock;

// constructors, getters, setters...
}
// Controller - activate validation with @Valid
@PostMapping
public ResponseEntity<Product> create(
@Valid @RequestBody Product product) {
// @Valid runs all constraints before this method body executes
// If name is blank or price is negative - exception thrown automatically
return ResponseEntity.status(201).body(productService.create(product));
}
@PutMapping("/{id}")
public ResponseEntity<Product> update(
@PathVariable Long id,
@Valid @RequestBody Product product) {
// @Valid applies to updates too - can't update with invalid data
return productService.update(id, product)
.map(ResponseEntity::ok)
.orElse(ResponseEntity.notFound().build());
}
When @Valid fails and you don't have a global exception handler, Spring returns a default 400 error with a large, unformatted JSON dump that includes Spring's internal stack information. This is not suitable for a production API. Always pair @Valid with a @RestControllerAdvice handler (Step 7) that catches MethodArgumentNotValidException and returns clean, structured field-level error messages.
Step 7 - Global Error Handling with @RestControllerAdvice
The final piece of a production-quality REST API is consistent error handling. Without it, different exceptions produce different response shapes - validation errors look different from not-found errors, which look different from server errors. Clients can't reliably parse your error responses.
@RestControllerAdvice provides a single class that intercepts every exception thrown from every controller and returns a consistent ApiError structure. The Map<String, String> fieldErrors in the ApiError class - populated by Collectors.toMap(FieldError::getField, FieldError::getDefaultMessage, ...) - uses Java's HashMap through the Streams API. Board Infinity's HashSet and Java collections guides cover Java's collection framework, and the Map<String, String> here maps each failing field name to its validation message - providing structured, field-level error information that API clients can use to show targeted error messages to users. The singleton catch-all @ExceptionHandler(Exception.class) - which never exposes stack traces to clients - applies the same exception hierarchy principle covered in Board Infinity's throw and throws in Java guide: Exception.class catches every unchecked exception in the hierarchy, making it the safety net for any unexpected error that reaches the controller layer.
public class ApiError {
private int                      status;
private String                   message;
private LocalDateTime            timestamp;
private Map<String, String>      fieldErrors; // for validation errors

public ApiError(int status, String message) {
    this.status    = status;
    this.message   = message;
    this.timestamp = LocalDateTime.now();
}

public ApiError(int status, String message,
                Map<String, String> fieldErrors) {
    this(status, message);
    this.fieldErrors = fieldErrors;
}

// getters...
}
// Example JSON response for a validation failure:
// {
//   "status": 400,
//   "message": "Validation failed",
//   "timestamp": "2025-05-08T10:30:00",
//   "fieldErrors": {
//     "name": "Product name is required",
//     "price": "Price must be a positive number"
//   }
// }
@RestControllerAdvice
public class GlobalExceptionHandler {
// Handle @Valid failures - returns field-level errors
@ExceptionHandler(MethodArgumentNotValidException.class)
public ResponseEntity<ApiError> handleValidation(
        MethodArgumentNotValidException ex) {

    Map<String, String> errors = ex.getBindingResult()
        .getFieldErrors().stream()
        .collect(Collectors.toMap(
            FieldError::getField,
            FieldError::getDefaultMessage,
            (e1, e2) -> e1 // keep first message if field has multiple errors
        ));

    return ResponseEntity.badRequest()
        .body(new ApiError(400, "Validation failed", errors));
}

// Handle product not found
@ExceptionHandler(ProductNotFoundException.class)
public ResponseEntity<ApiError> handleNotFound(
        ProductNotFoundException ex) {
    return ResponseEntity.status(404)
        .body(new ApiError(404, ex.getMessage()));
}

// Handle type mismatch - e.g. passing "abc" for a Long @PathVariable
@ExceptionHandler(MethodArgumentTypeMismatchException.class)
public ResponseEntity<ApiError> handleTypeMismatch(
        MethodArgumentTypeMismatchException ex) {
    String msg = ex.getName() + " must be a valid "
        + ex.getRequiredType().getSimpleName();
    return ResponseEntity.badRequest()
        .body(new ApiError(400, msg));
}

// Catch-all - never expose stack traces to clients
@ExceptionHandler(Exception.class)
public ResponseEntity<ApiError> handleAll(Exception ex) {
    return ResponseEntity.internalServerError()
        .body(new ApiError(500, "An unexpected error occurred"));
}
}
Once your application is running on port 8080, you can test every endpoint immediately. In Postman: set the method (GET/POST/PUT/DELETE), enter the URL (http://localhost:8080/api/products), add a JSON body for POST/PUT requests, and hit Send. IntelliJ IDEA Ultimate includes a built-in HTTP client - create a .http file and write requests directly. Both tools let you test validation errors, 404 responses, and success cases without writing any test code.
Further Reading
Board Infinity Guides:
- OOP Concepts in Java
- Core Java Concepts and Syntax
- Classes and Objects in Java
- Abstraction vs Encapsulation in Java
- Understanding Polymorphism in Java
- Access Modifiers in Java
- What is Composition in Java?
- Understanding Servlets in Java
- Generics in Java
- Understanding Wrapper Class in Java
- Learn About Java List
- Learn About Map Stream in Java
- Understand HashSet in Java
- Learn About Throw and Throws in Java
- Essentials of Back-End Development: From APIs to Databases
External Resources:
- Spring MVC Official Documentation
- Spring Boot Official Docs - Building a RESTful Web Service
- Jakarta Bean Validation - Constraint Annotations Reference
Spring Framework: Core & Web Development on Coursera
This free Coursera course by Board Infinity goes beyond this tutorial - covering Spring Core, IoC, dependency injection, complete MVC web application development, bean validation, and professional error handling through hands-on project work. Every module builds toward a working, production-ready Spring application.
✓ Certificate available · ✓ Self-paced · ✓ Beginner-friendly
Conclusion
Building a REST API with Spring MVC follows a clear, repeatable pattern: set up your project with the right starters, create a model with validation constraints, write a service layer to handle business logic, build a controller that maps HTTP methods to service calls, and add a global exception handler that catches every failure and returns consistent, structured error responses.
Each of the seven steps in this tutorial solves a specific, real problem that every production REST API faces. Project setup determines your available tools. The controller layer handles routing. Path variables, request params, and request bodies provide three clean ways to accept input. Validation prevents bad data from reaching your database. And global error handling makes your API's failure responses as predictable as its success responses.
This is the foundation. From here, the natural next steps are connecting a real database with Spring Data JPA, adding authentication and authorisation with Spring Security, and implementing pagination for large result sets - all of which build directly on the pattern established here. The full backend architecture picture that this API fits into is covered in Board Infinity's Essentials of Back-End Development: From APIs to Databases guide, and the Java fundamentals that underpin every layer of the API - OOP, encapsulation, generics, collections, and exception handling - are covered comprehensively in Board Infinity's understanding polymorphism in Java guide.